Configure Build Triggers
BuildNinja supports Build Triggers that allow builds to start automatically based on time schedules or Git activity. These triggers help streamline workflows by eliminating the need for manual build execution.
Build Triggers can be created, viewed, and managed from both the Triggers tab within a build configuration and the Triggers Dashboard  , providing centralized visibility and control.
BuildNinja supports the following trigger types:
- Scheduled Trigger: Scheduled trigger runs builds automatically according to a predefined schedule.
- Git Trigger: Git trigger starts builds automatically when changes are detected in a Git repository.
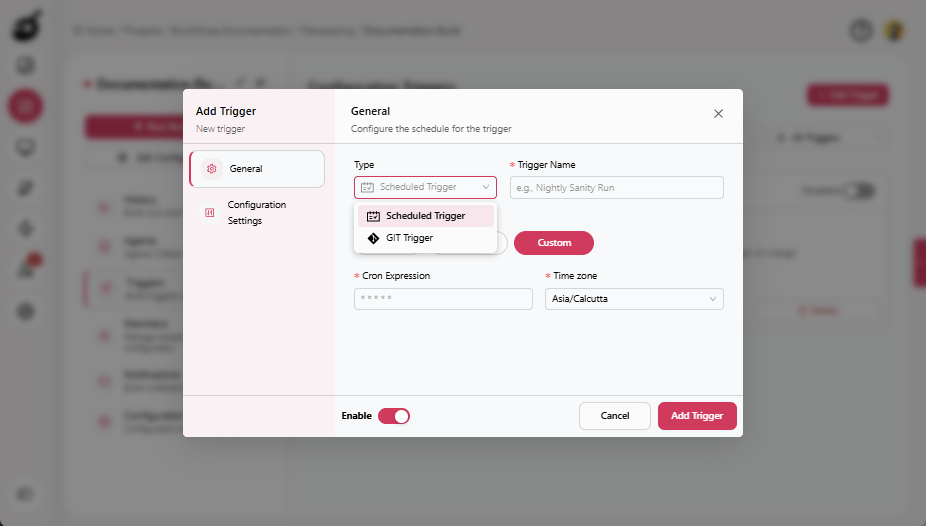
The trigger type is selected using the global trigger Type field when creating or editing a trigger, and additional configuration options are displayed based on the selected type.
Scheduled Trigger
Scheduled trigger runs builds according to a defined schedule, such as at specific times, intervals, or days. They are commonly used for routine tasks like nightly builds, periodic testing, or regular maintenance runs. The following schedule types are supported:
-
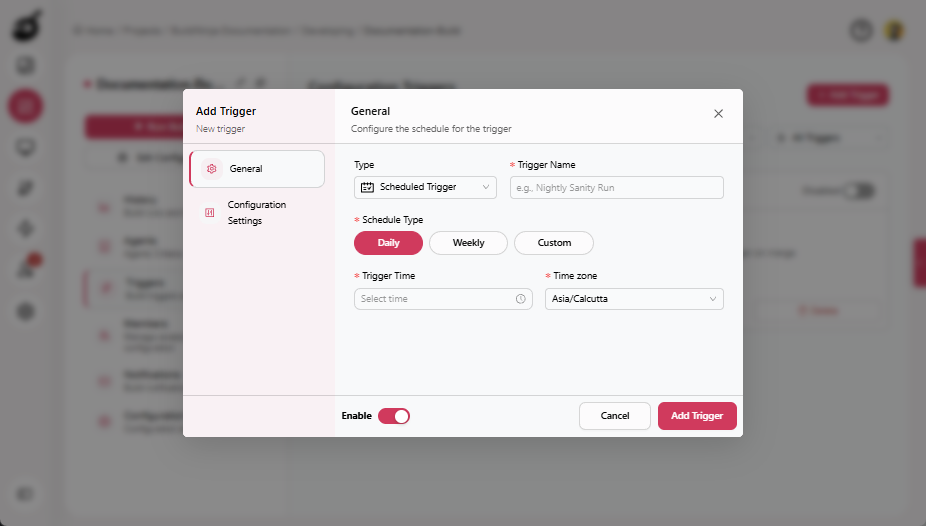
Daily: Runs once every day at a specified time.
-
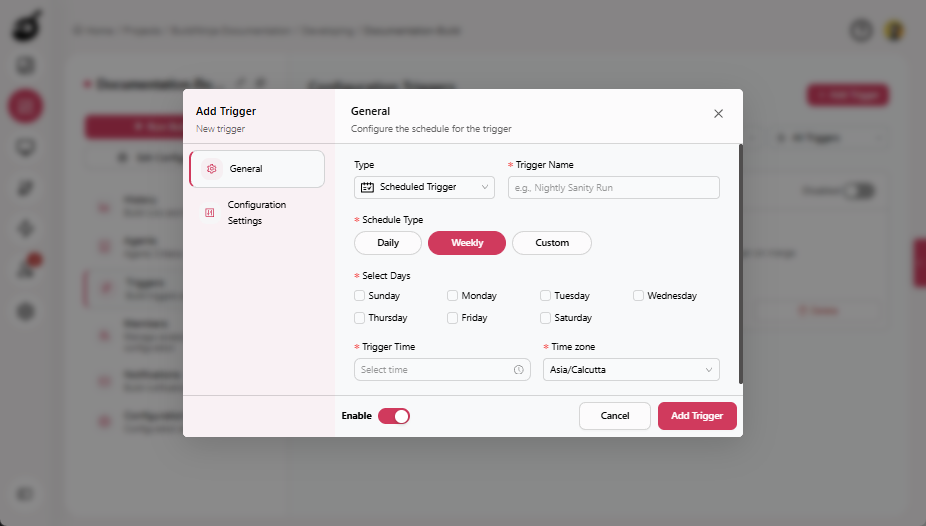
Weekly: Runs on selected days of the week at a specified time.
-
Custom (Cron Expression): Runs based on a custom cron schedule.
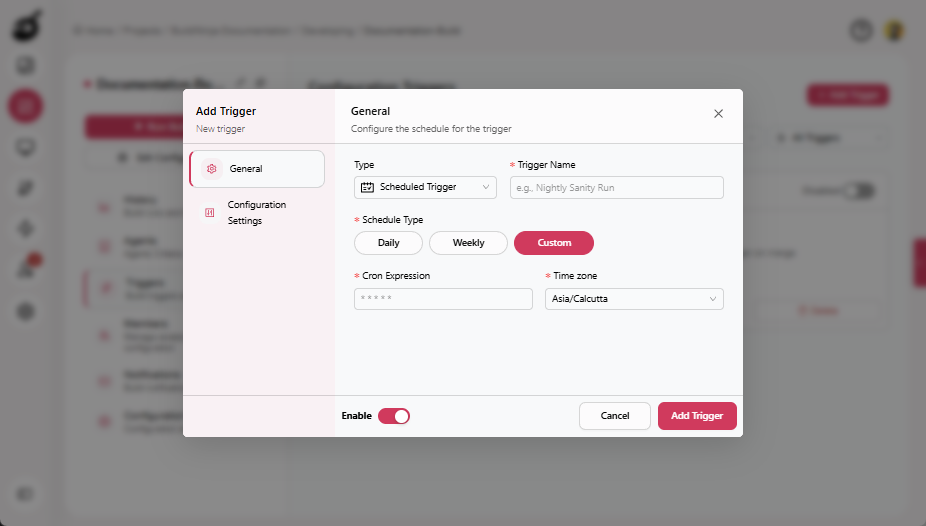
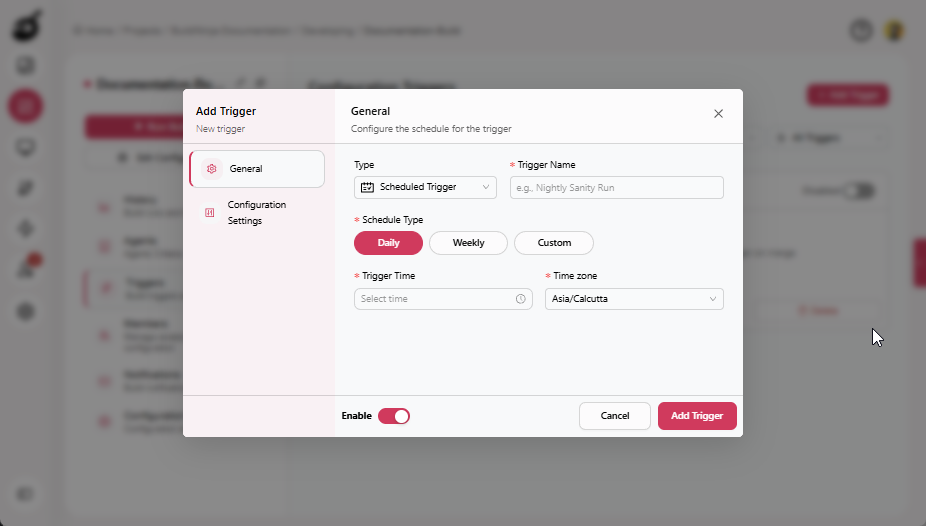
General Settings
General settings define the basic properties of a scheduled trigger, including its identity, execution timing, and activation state. The following common settings are available:
- Trigger Name: A descriptive identifier used to distinguish the trigger.
- Schedule Type: Specifies how often the trigger runs. Supported options include Daily, Weekly, and Custom (Cron Expression).
- Trigger Time: The time at which the build is executed. Not applicable to Custom (Cron Expression) schedules.
- Time Zone: The time zone used to evaluate the trigger schedule.
- Enable Trigger: Enables or disables the trigger.
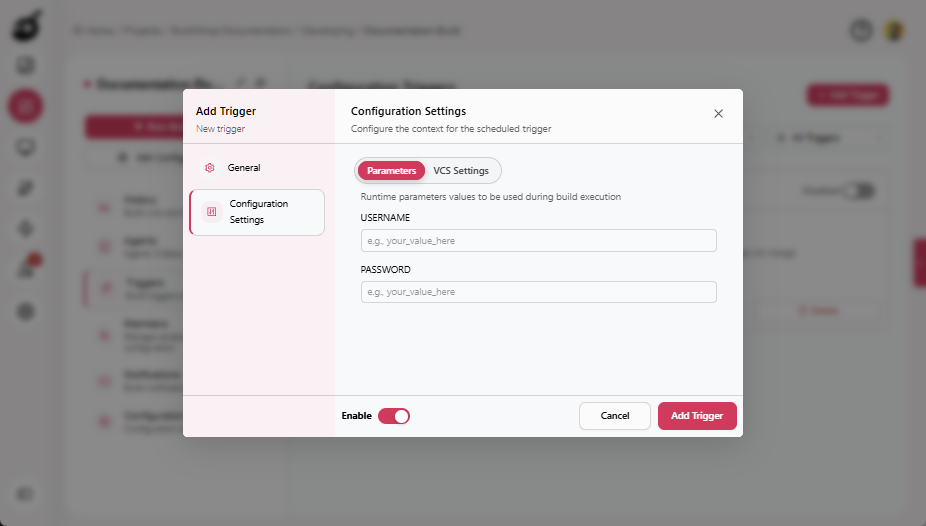
Configuration Settings
Configuration settings define optional runtime values that are injected into the build during execution and influence how the build is evaluated. The following configuration settings are available:
-
Parameters: Displays parameters marked as Prompt on Run. All parameters are optional and can be provided or overridden at trigger execution time.
-
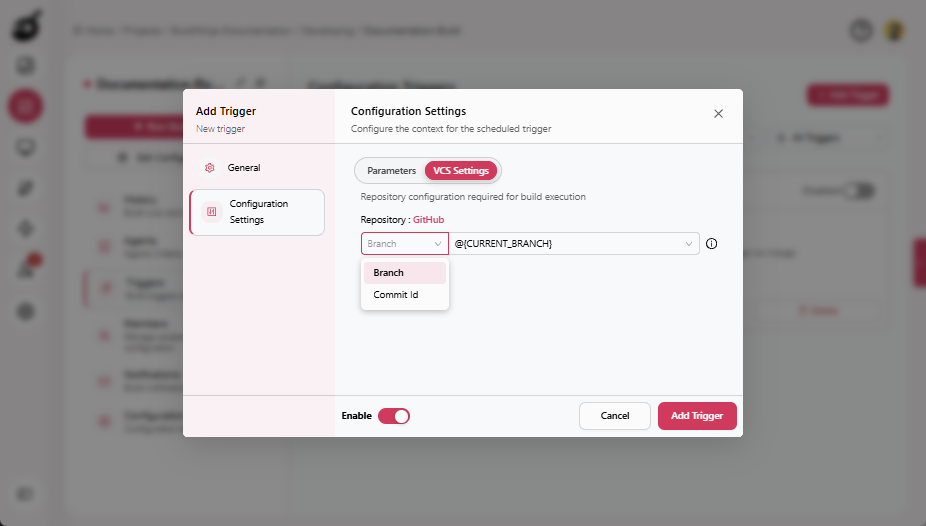
VCS Settings: VCS settings define the source control context used when the build is triggered, including the branch and commit to build against.
- Branch: Specifies the Git branch to use for the build. All repository branches are supported, along with the following dynamic values.
@{DEFAULT_BRANCH}: Uses the default branch configured for the selected VCS.@{CURRENT_BRANCH}: Uses the branch that triggered the Git event.
- Commit ID: Specifies a commit SHA to build. When this field is set, the Branch field is ignored and the build runs for the specified commit only.
- Branch: Specifies the Git branch to use for the build. All repository branches are supported, along with the following dynamic values.
Git Trigger
Git trigger automatically starts builds when specific Git events occur, such as code pushes, branch updates, or pull request activity. These triggers ensure that changes in the repository are validated immediately, helping teams detect issues early in the development lifecycle. The following Git events are supported:
- Push: Triggered when commits are pushed to a matching branch.
- Merge: Triggered when commits are merged into a branch.
- All: Triggered for both push and merge events.
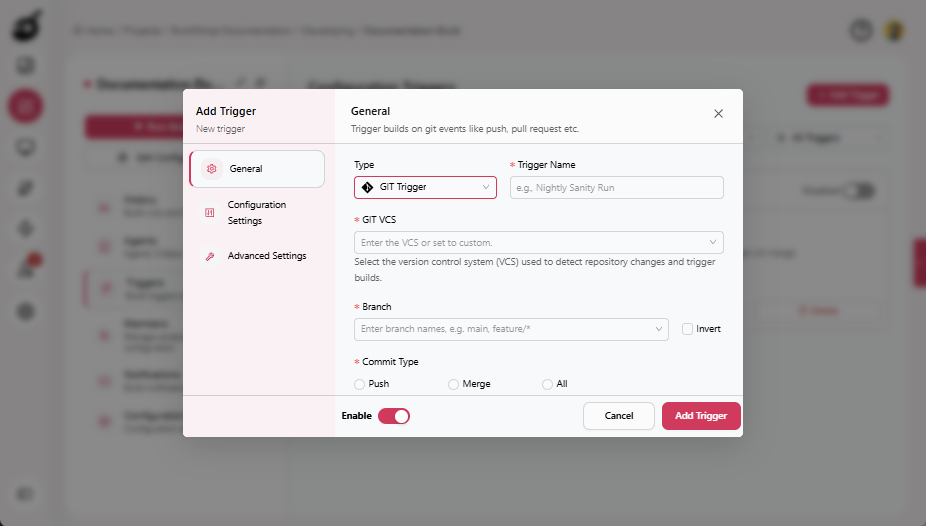
General Settings
General settings define the core configuration required to create and identify a Git-based trigger and determine which repository events initiate a build. The following general settings are available:
- Trigger Name: A required, descriptive identifier used to distinguish the trigger.
- VCS: Select a version control system linked to the build configuration or choose Custom.
- Custom: Use this option to configure a Git repository that is not already linked to the build configuration. Custom repositories require manual specification of connection details.
- Repository URL (required): URL of the Git repository.
- Username: Username used to authenticate with the repository.
- Password (optional): Password or personal access token used for authentication.
- Custom: Use this option to configure a Git repository that is not already linked to the build configuration. Custom repositories require manual specification of connection details.
- Branch: Specifies one or more branch names or patterns used to match incoming Git events. Multiple entries can be configured.
- Invert: Triggers the build when the branch does not match the specified pattern.
- Commit Type: Specifies which Git events trigger the build (Push, Merge, or All).
- Enable Trigger: Enables or disables the trigger.
Configuration Settings
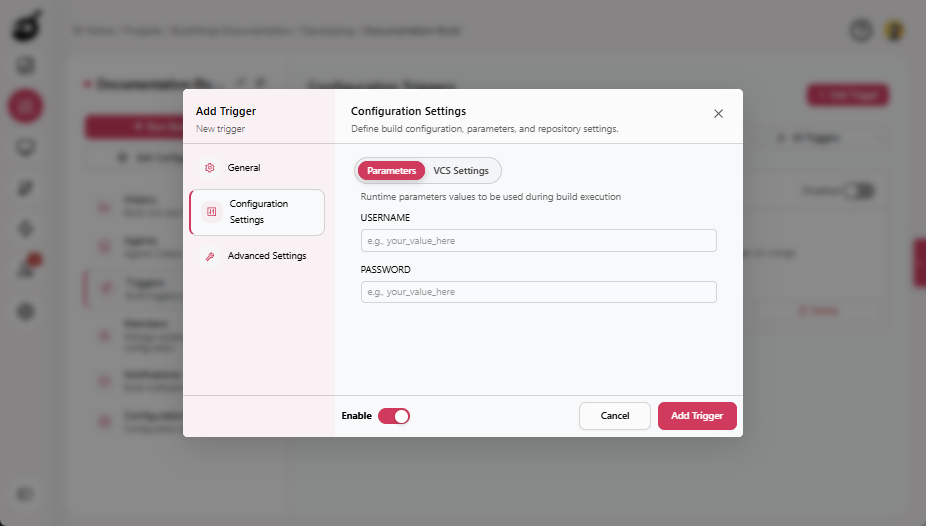
Configuration settings allow you to provide optional runtime values such as parameters and VCS context. The following configuration settings are available:
-
Parameters: Displays parameters marked as Prompt on Run. All parameters are optional and can be provided or overridden at trigger execution time.
-
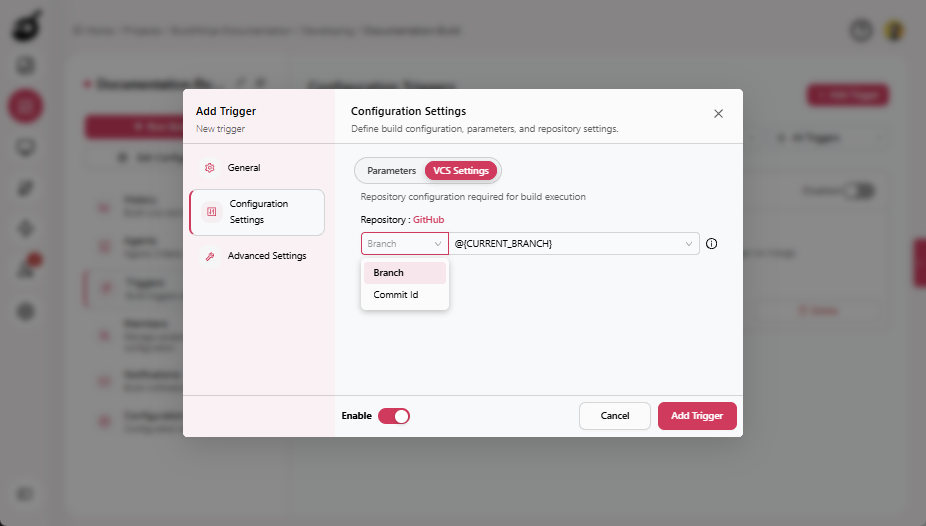
VCS Settings: VCS settings define the source control context used when the build is triggered, including the branch and commit to build against.
- Branch: Specifies the Git branch to use for the build. All repository branches are supported, along with the following dynamic values.
@{DEFAULT_BRANCH}: Uses the default branch configured for the selected VCS.@{CURRENT_BRANCH}: Uses the branch that triggered the Git event.
- Commit ID: Specifies a commit SHA to build. When this field is set, the Branch field is ignored and the build runs for the specified commit only.
- Branch: Specifies the Git branch to use for the build. All repository branches are supported, along with the following dynamic values.
Advanced Settings
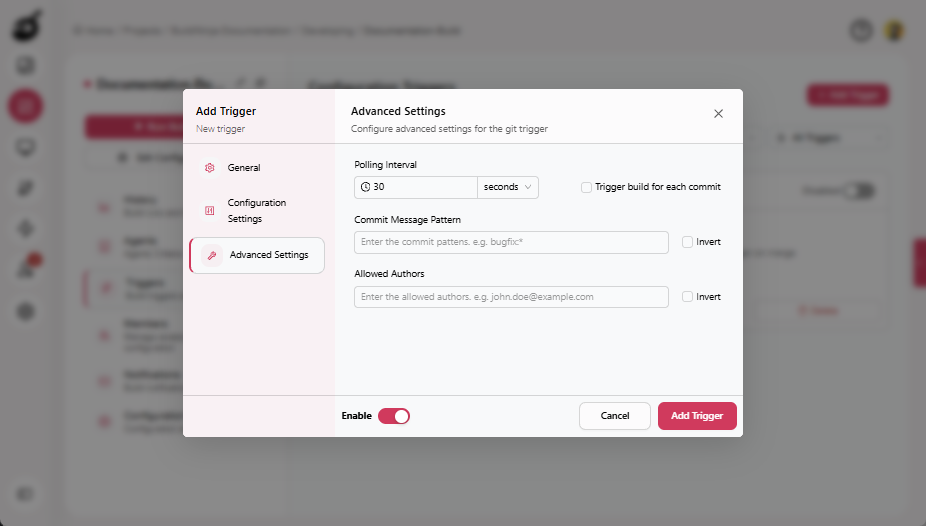
Advanced settings provide optional filtering and control over when Git-based triggers initiate builds. The following advanced settings are available:
- Polling Interval: Defines how frequently Git changes are checked for triggering builds.
- Trigger Build for Each Commit: Runs a separate build for every commit detected between polling intervals.
- Commit Message Pattern: Specifies one or more patterns used to match commit messages. Builds trigger only when commit messages match the configured patterns. Multiple entries can be configured.
- Invert: Triggers builds when the pattern does not match.
- Allowed Authors: Filters commits based on author email patterns.
- Invert: Excludes commits from authors matching the specified pattern.
Add Trigger via Triggers Tab
Configure triggers directly from the build interface under the Triggers tab. Use this option when managing triggers for a specific build configuration, as it provides quick access to the build’s associated triggers.
This procedure demonstrates how to configure a Scheduled trigger. Configuration steps for Git triggers may vary.
-
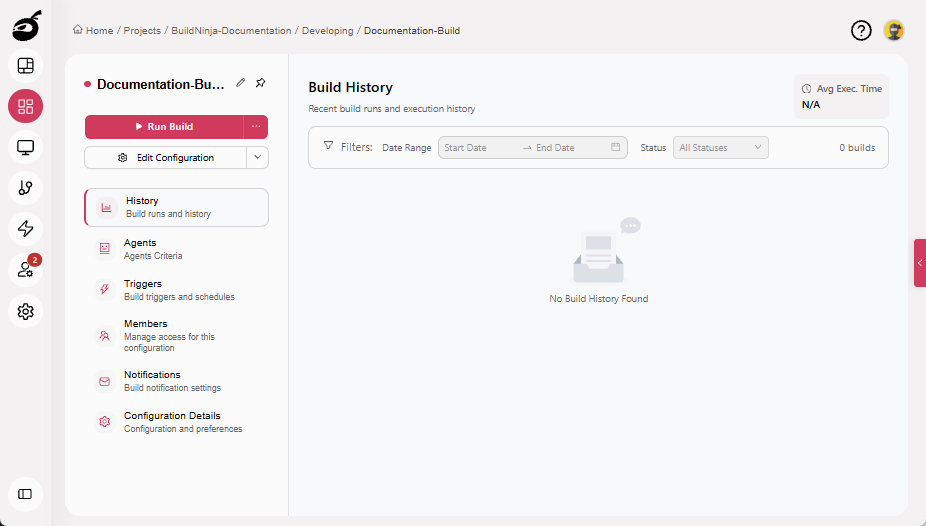
Navigate to the build for which you want to add a trigger.
-
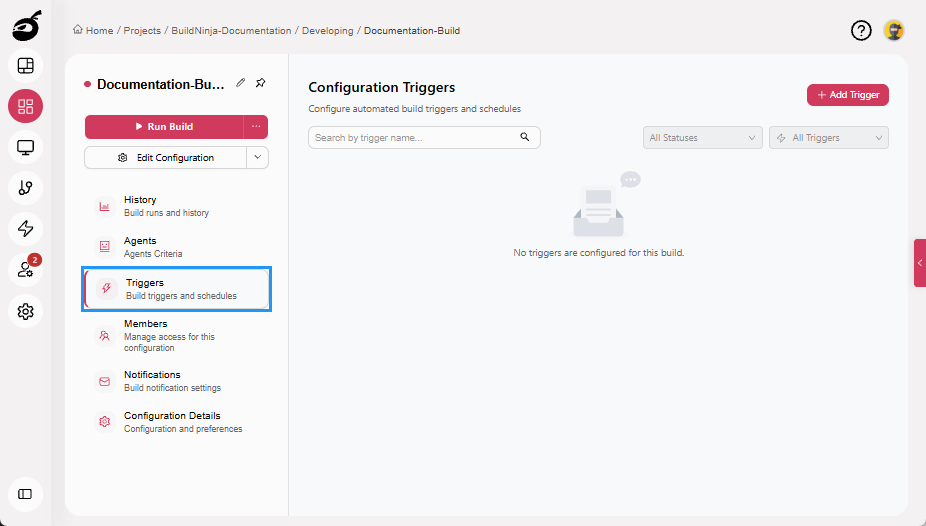
Go to the Triggers tab.
-
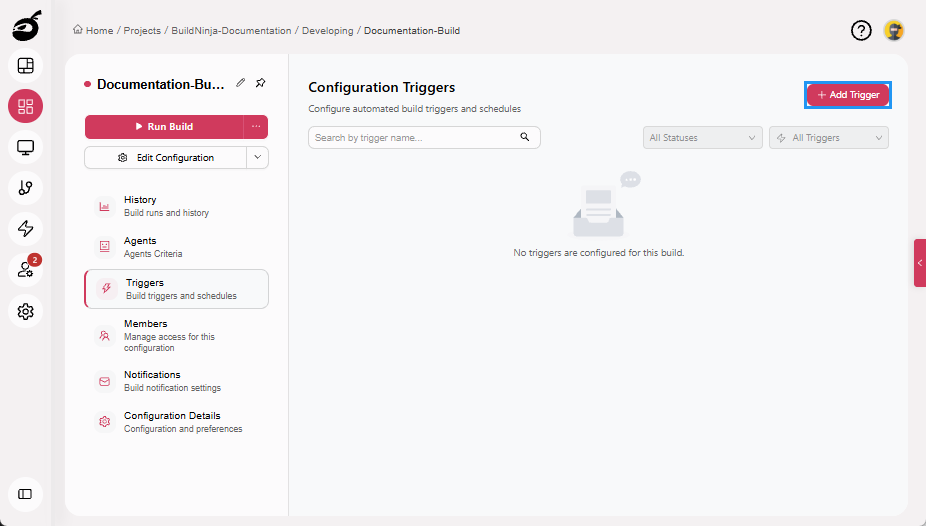
Click Add Trigger.
-
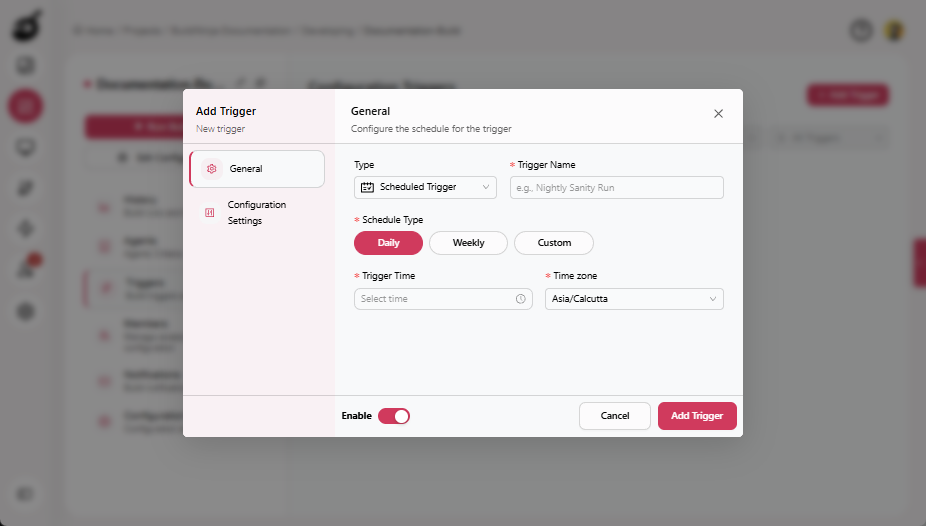
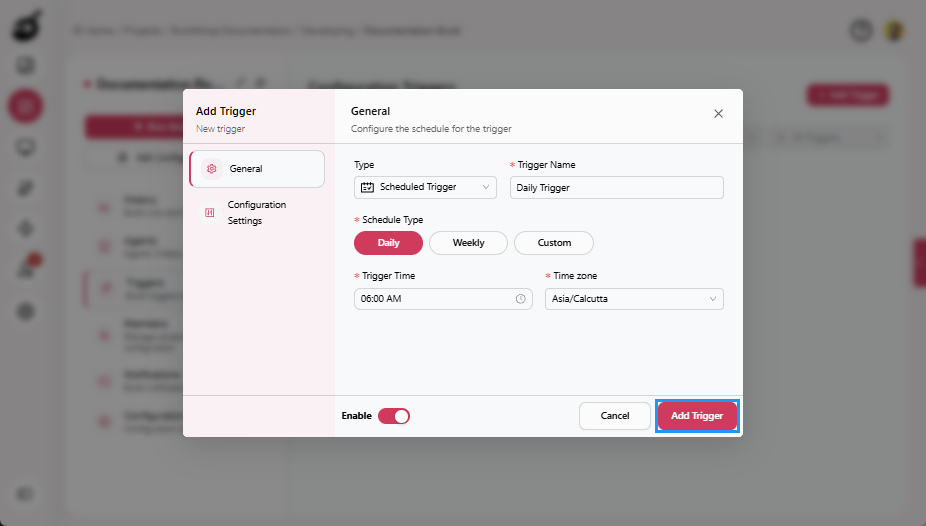
Set the following values:
- Type (Scheduled or Git)
- Trigger Name
- Schedule Type (Daily, Weekly, or Custom)
- Trigger Time (not applicable to Custom (Cron Expression) schedules).
- Time Zone
-
Click Add Trigger to save and create the trigger.
Add Trigger via Triggers Dashboard
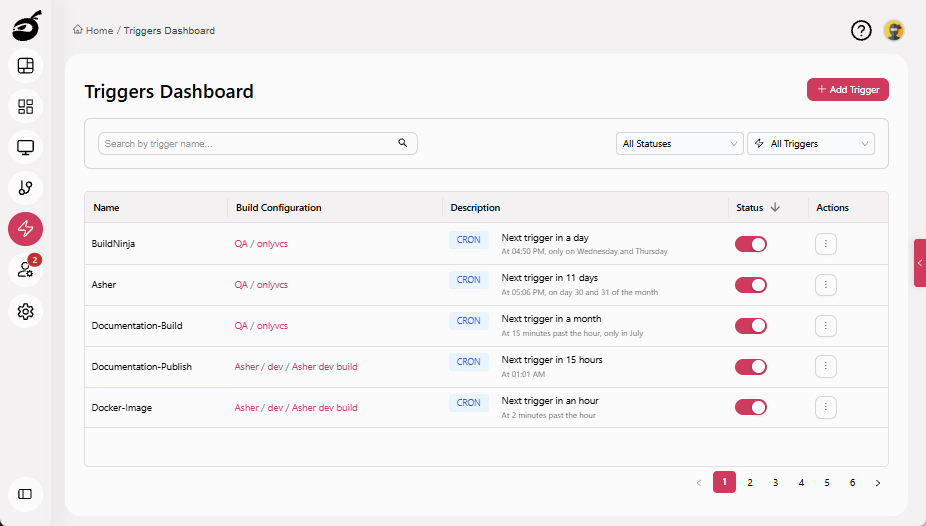
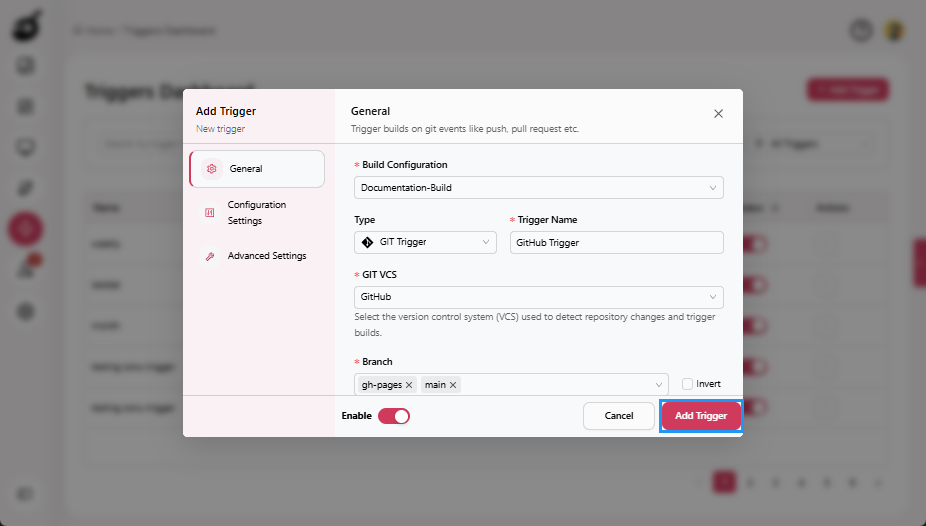
Use Triggers Dashboard to configure and manage build triggers in a centralized location. This is helpful when managing multiple triggers across different builds or projects. You can also search triggers and filter them based on status or build configuration for faster access and organization.
This procedure demonstrates how to configure a Git trigger. Configuration steps for Scheduled triggers may vary.
-
Navigate to Triggers Dashboard from the sidebar.
-
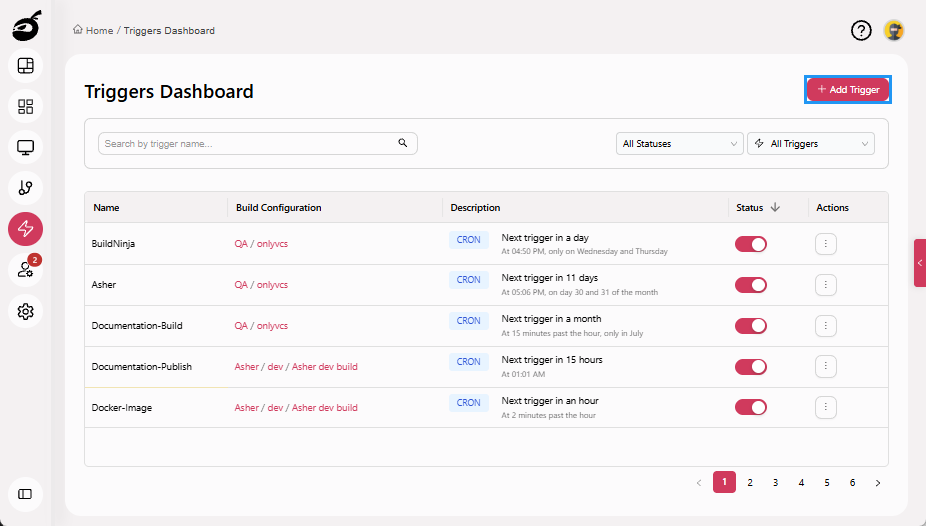
Click Add Trigger.
-
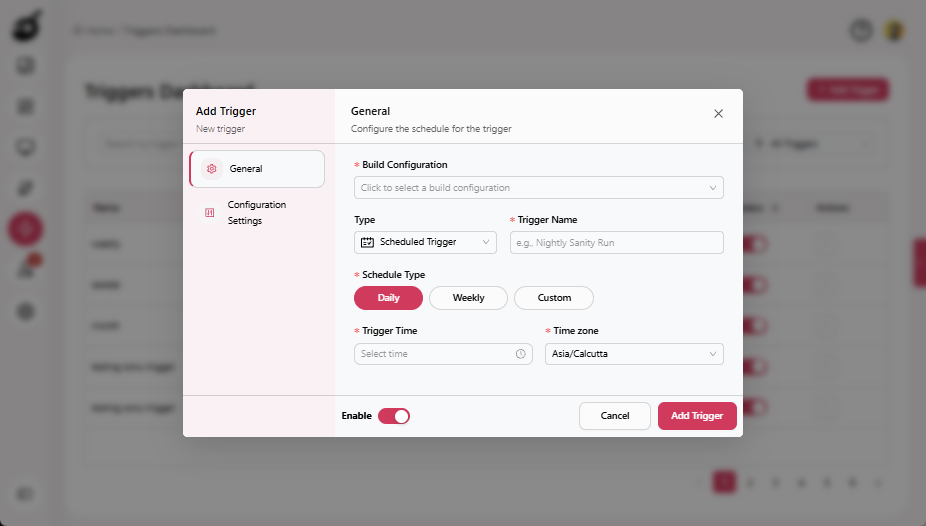
Set the following values:
- Build Configuration (select the build to which this trigger will apply.)
- Type (Scheduled or Git)
- Trigger Name
- VCS
- Branch
- Commit Type (Push, Merge, or All)
-
Click Add Trigger to add the trigger.
Manage Triggers
You can Edit, Enable or Disable, and Delete triggers directly from either the Triggers tab or the Triggers Dashboard within a build configuration.
Edit Trigger
- Navigate to the Triggers tab or the Triggers Dashboard of a specific build.
- Locate the trigger using filters or search.
- Edit the trigger:
- If you are on the Triggers tab, click Edit
 button directly on the trigger card.
 - If you are on the Triggers Dashboard, click the Ellipses menu
 next to the trigger, and then select Edit
  button.
- If you are on the Triggers tab, click Edit
- Modify the desired settings.
- Click Update Trigger
 to save your changes.
Enable or Disable Trigger
- Navigate to the Triggers tab or the Triggers Dashboard of a specific build.
- Locate the trigger using filters or search.
- Change the trigger status:
- If you are on the Triggers tab, click Enable or Disable
 toggle button directly on the trigger card to change the status.
 - If you are on the Triggers Dashboard, check the Status column and toggle the button
 depending on the current state.
- If you are on the Triggers tab, click Enable or Disable
Delete Trigger
- Navigate to the Triggers tab or the Triggers Dashboard of a specific build.
- Locate the trigger using filters or search.
- Delete the trigger:
- If you are on the Triggers tab, click Delete
 button directly on the trigger card.
 - If you are on the Triggers Dashboard, click the Ellipses menu next to the trigger, and then select Delete
 button.
- If you are on the Triggers tab, click Delete
- Confirm the deletion when prompted.
Filter Triggers
The Triggers tab and the Triggers Dashboard within each build configuration both include filters to help you quickly locate specific triggers and manage large or complex setups efficiently. You can filter the triggers based on:
- Trigger Name: Search by name to quickly find a specific trigger.
- Status: View triggers by state (All Statuses, Enabled, or Disabled).
- Schedule: Filter by schedule type (All Schedules, Daily, Weekly, or Custom).


View Trigger Logs and Errors
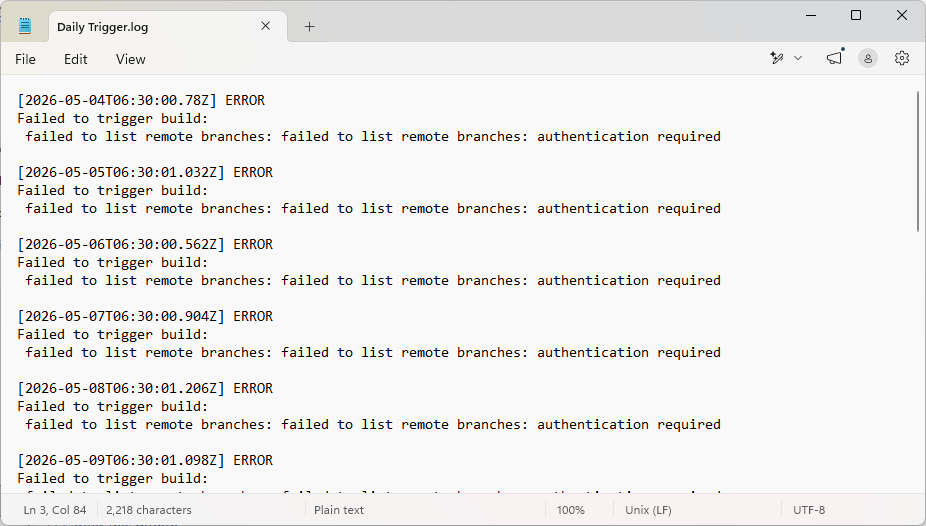
BuildNinja provides trigger-level logs to help identify and troubleshoot failed trigger executions. These logs capture details of recent trigger runs and explain why a trigger did not start a build as expected.
When a trigger fails, BuildNinja displays a Failed status indicator next to the trigger name in the Triggers Dashboard. Newly failed triggers are visually highlighted to draw attention to recent issues, enabling quick identification of problematic triggers without reviewing each one individually.
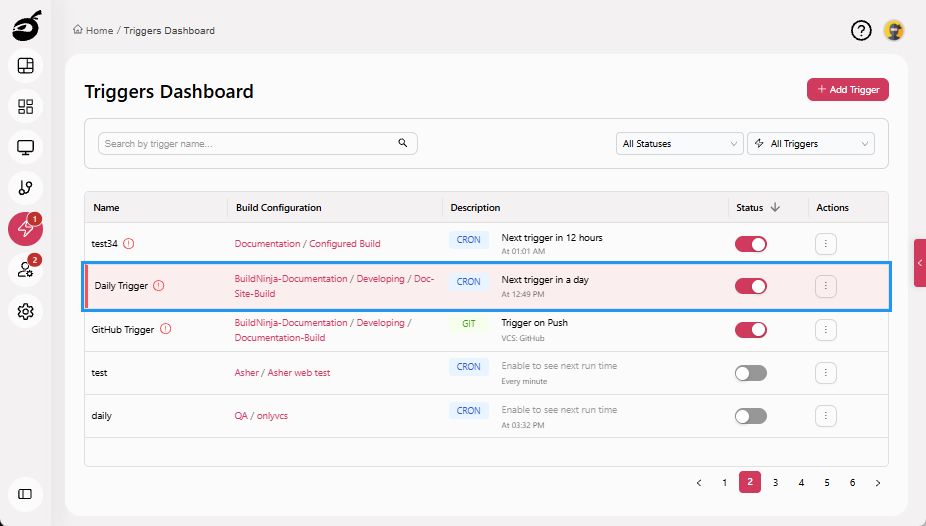
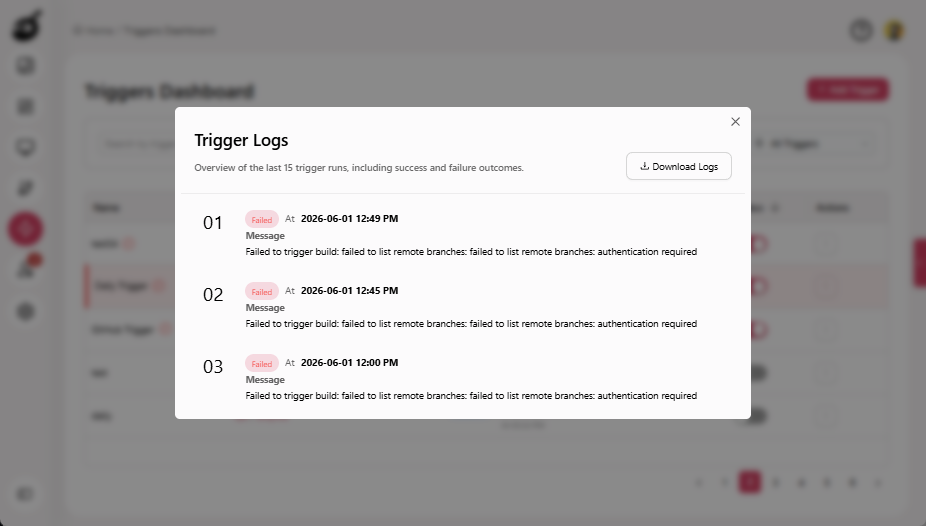
Opening the Trigger Logs dialog displays the execution history for the selected trigger, including up to the last 15 trigger runs. Each entry includes:
- A message describing the trigger outcome or error condition
- Run status (Success or Failed)
- Execution timestamp
Use this information to verify whether the trigger executed correctly and to determine why a build may not have been initiated. Logs can also be downloaded for further analysis or sharing.
Access Trigger Logs
-
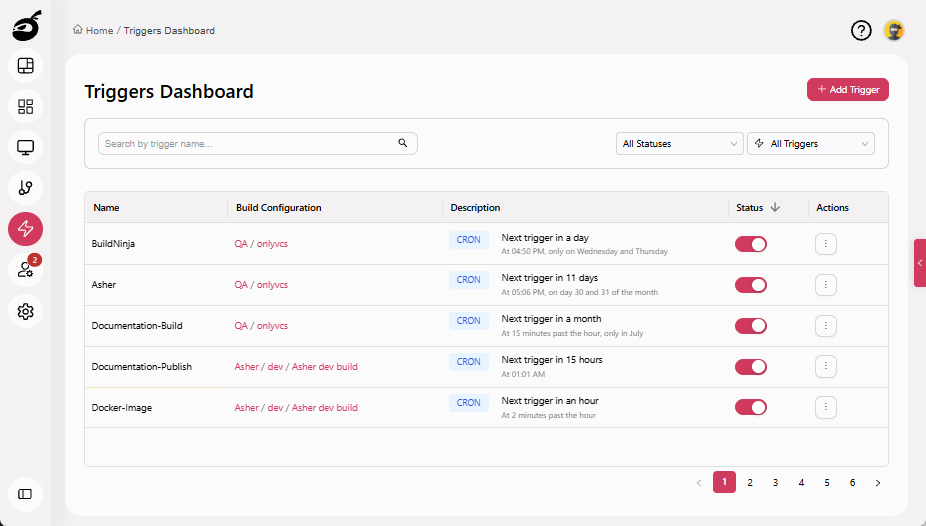
Navigate to the Triggers Dashboard.
-
Locate the trigger you want to inspect.
-
View trigger logs by clicking Failed status indicator next to the trigger name or by selecting Check Logs from the trigger’s Ellipsis menu.
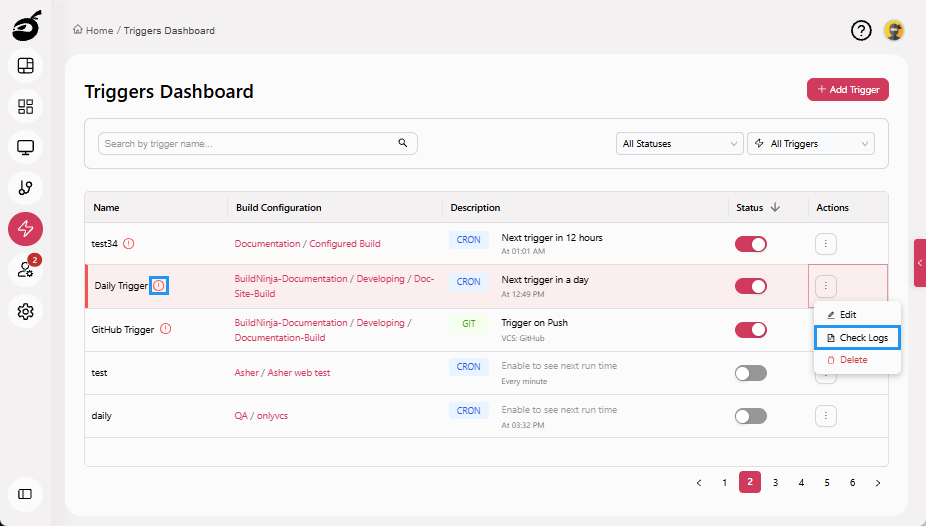
The Trigger Logs dialog opens, displaying details for recent trigger executions such as execution status, timestamps, and messages that help you diagnose trigger-related issues.
Download Trigger Logs
-
Open the Trigger Logs dialog.
-
Click Download Logs.
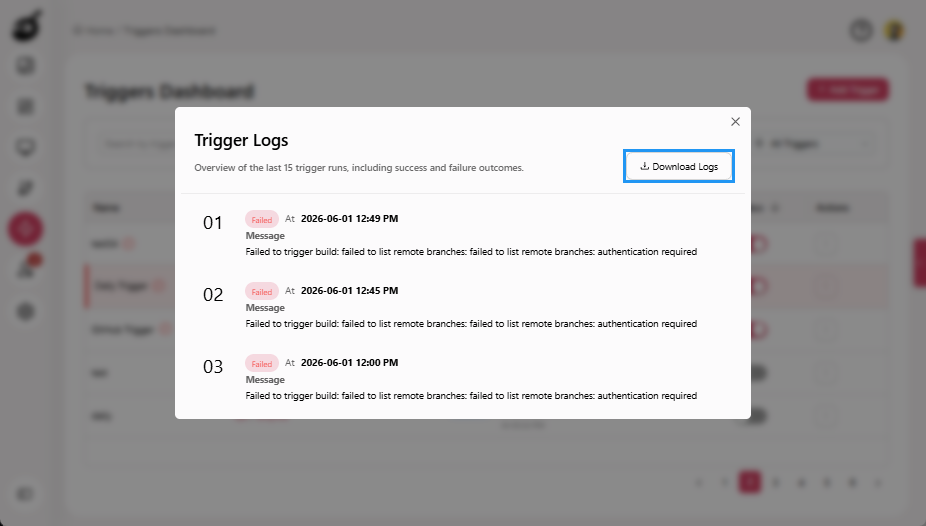 The downloaded file includes details of recent trigger runs, including execution status, timestamps, and messages.